So you have become the proud owner of an acrylic bath. It's time to install it. How to do it? Need to urgently call the masters? You should not spend time and money on it, which are never superfluous. In fact, everything is quite simple and quick. How? Read on.
Preparing to install a bath of acrylic
Before you start installing the purchased acrylic bath, you need to carry out preliminary work - to prepare the place where you plan to install it, the structure itself. Remove all excess from the bathroom, dismantle unnecessary equipment left over from the old bath. Stock up on the necessary tools and materials. It will take the following:
- the bath itself;
- legs from the kit or frame that will serve as a support for the bowl;
- percussion instrument - hammer;
- Bulgarian - for trimming unnecessary elements;
- perforator - for making holes;
- sealant;
- fluid level;
- set of wrenches;
- insulating tape;
- construction tape;
- corrugated pipe ;
- fasteners.
Before you start installing a structure, you must do the following:
- the first thing to exclude the flow of water;
- dismantle the existing bath;
- remove the drain;
- clean the drain hole;
- install a corrugation into the drain hole;
- process joints between the corrugation and the sewer opening with sealant;
- level the floor.
Can't wait to put on a new bath? It's time to start installing it!
The acrylic structure can be set using the following methods:
- use a metal frame;
- use the feet from the kit;
- install it on a brick support;
- set the bath on the brick podium.
How to set up their acrylic bath yourself
The rules for installing acrylic bathtubs allow any of the following options. If, opening the box, you find a metal frame, it is better to use it. If only the support legs are included, feel free to install the product on them. They are made specifically for this model. When developing, we explicitly took into account the high voltage zones of the structure.
Using the feet from the kit
Perhaps the easiest way to install a bath. It does not require special training and any special tools. There are no difficulties if you follow the instructions in the package exactly. If it requires holes to be drilled in the bowl, this must be done using a wood drill. The drill should be set at low speed. Installation on the support legs means that you need to screw them to the bowl and adjust in place:
- Installation of legs. Special places are made in the lower part of the bowl, it is difficult not to notice them, since they are marked with special pictograms or stickers. To facilitate assembly, most manufacturers already at the factory make holes in the bottom. But if they are not there - it does not matter. You can always do them yourself. After the holes are prepared, the legs are fixed in them. If you install the legs in other places, the load will be distributed unevenly, and this can lead to breakage.
- Adjustment of supports. Almost any legs can be adjusted in height - this allows you to set the desired slope. To begin with, the bath should be installed close to the wall, and after that the supports should be adjusted, selecting the required height. Then you should set the structure horizontally. To do this, the level must be on the side. If necessary, the support can be twisted up or down.

Once the legs are in position, they should be locked. To enhance reliability, you can use plastic hooks and attach the bathtub to the wall.
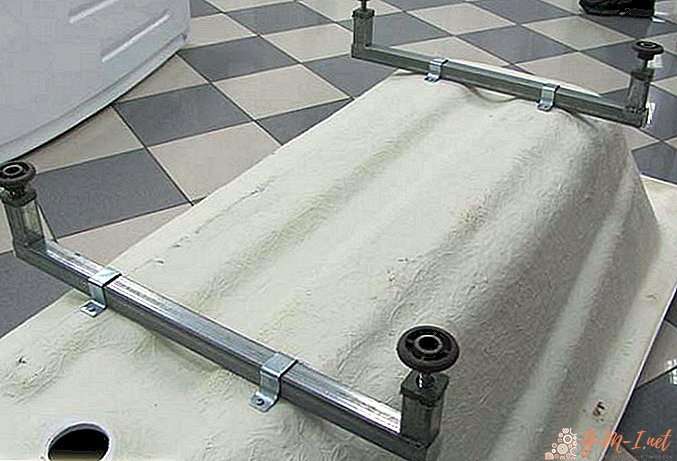
Using a metal frame
If you follow the instructions exactly, you will get the most reliable fastening, and most importantly, very simple. The technology is as follows:
- First of all, with the help of those screws that were put in the kit, the frame is assembled.
- We tilt the half-finished frame to the side to facilitate installation work.
- It is time to put the frame on the bath. Attached to the supports legs.
- In the central part of the frame, we fix the supports, install another couple along the wall, outside the bowl - three supports.
- Adjust the height of the supports. The design should not stand higher than sixty-five centimeters.
- Now put the structure on its feet and check whether everything is exactly horizontal and vertical.
- Now it's time to put in the case of overflow and siphon.
- Additionally, you can attach the bowl to the wall.
- It remains to put the screen.
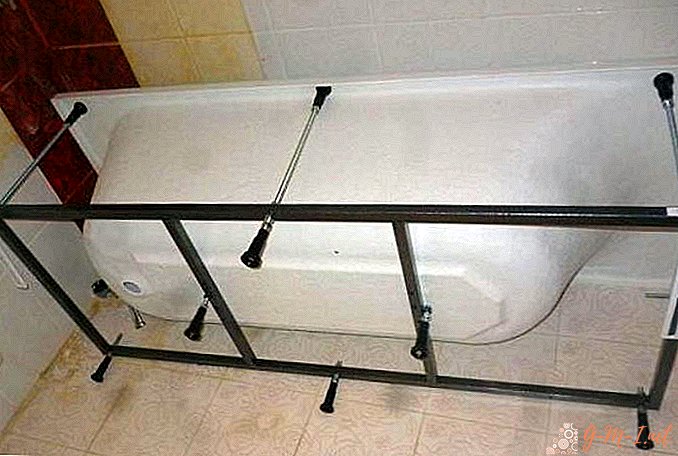

Reference! The frame with legs can be mounted directly on the floor, and only then install a bath on it. As a rule, additional fasteners are not required.
Using brick supports
If it happens that the metal frame is not in the package, the bath should be mounted on a brick runway. This is not the cheapest installation option, although the design will be very durable, but it will take a lot of brick. In addition, there will be an additional load, which is not very beneficial for the overlappings, because such a podium weighs a lot.
To make the construction cheaper, as well as to reduce the weight that will put pressure on the floor, the bath is placed on brick supports. On such a construction will take only twelve bricks and a bit of mortar.
During installation, we adhere to the following technology:
- We bring the bath into the room where we plan to install it. We mark the places where the brick supports will cost.
- The length of the bowl mark the location of two or three columns. In this case, one should be in the center, and the other two at the edges.
- Now we will take the product out of the room and proceed to laying the supports. They should be raised to a height of nineteen centimeters so that the total height of the structure above the floor does not exceed sixty-five centimeters.
- We leave the clutch for a day to dry, then we connect the siphon and put it on ready-made supports.
- We use silicone sealant to seal the gaps between the support and the bottom.
- We use metal hooks - we attach the bath to the wall.
Reference! Professionals advise applying foam to the bottom of the bath before installing it. Thus, we reduce the thermal conductivity, reduce the resonating ability and prevent the bowl from being damaged by brick supports.
Using a brick podium
If your bath does not have a metal frame, you have to lay a podium out of brick. This method is no worse than the version with brick columns, only time is spent on it, and it is dirtier. For installation, you will need a saw, mounting foam, bricks, moisture-resistant plywood and the actual mortar.
Here is the whole simple technology:
- We install the bath where it will be located in the future. Mark the place where there will be a drain. This must be done to provide a place on the podium for connecting a drain.
- We lay out the podium under the whole bowl, its sides should be no more than sixty centimeters high. Do not forget that between the bricks and the bathroom there will still be about three centimeters of mounting foam.
- Using moisture-proof plywood, we collect the box around the perimeter of the podium. Do not forget that plywood should rise above the podium to a height equal to the thickness of the foam.
- We cover the entire podium with mounting foam, lay a sheet of plywood on top of the foam.
- Set the bath on the podium, check how everything stands out.
- Pour water to half the bath. This will allow the foam to harden evenly. It is necessary to withstand the day before the foam completely hardens.
- We connect plums and overflows and hooks fasten the construction to the wall.
Modern baths have a sloping bottom, which accelerates the flow of water. Therefore, place it exactly horizontally without making any biases.
Leave Your Comment